Our Quality Management Process
ISO Certification
The quality system is certified according to ČSN EN ISO 9001:2016 – Production and assurance of production cooperation in the field of engineering products, awarded by TÜV SÜD CZECH s.r.o. and is comparable to the EN ISO 3834 certificate (specific quality requirements for fusion welding of metal materials).
Standards
Customer standards, standard European standards, Czech standards used in engineering for welding, machining and use of materials (ČSN EN ISO 2768, 5817, ČSN EN 10025, 10029, 10051, 10219 and others) are commonly applied.
Systems and Methods
Within ISMM we have our own LEAN Management system called “PENALTA”. ISMM also uses basic management methods and procedures – PDCA, Ishikawa diagram, brainstorming, 5Why, 5S, Action plan, 8D, or PPAP.
Audits
ISMM is subject to regular audits according to the ISO 9001 standard as well as customer audits. We also use internal audits to verify the functionality of processes and supplier audits to demonstrate the ability to supply materials and services to ISMM.
Metrology and Inspection
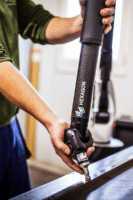
In order to verify the fulfilment of product and service requirements for the customer, input, interim and output inspections are carried out at precisely defined dates, parameters and volumes, with a precisely defined record of the inspection/measurement result. Inspection protocols are also created when starting new production. Non-destructive testing methods are used, and destructive methods are also used if required by the customer. In general, a wide range of measuring equipment is used to measure product parameters, from basic meters, micrometers, cavity gauges, pins, calipers, altimeters, depth gauges, protractors, etc. For the most accurate measurement (3D measurement), a 6-axis arm from the company Hexagon with a range of more than 3.5 metres is used.
Quality Assurance Contract
In case of need or requirement, a “Quality Assurance Contract” is individually concluded with each customer, which is then implemented under real production conditions with this implementation subsequently being subject to supplier audits of our customers.
The quality assurance contract usually contains the following points:
- Compliance with the design requirements for manufactured parts: supplied parts must comply with drawings, technical specifications and general technical regulations, measurement protocols and internal technical standards of our customers.
- Language: all documents (invoices, delivery notes, measurement reports, etc.) are always kept in the agreed language (English, German).
- Storage of materials: materials are labelled and stored so that confusion cannot occur when processing different materials.
- Welding technology: all welders are certified according to ISO 9606-1, only permitted and customer authorized welding materials are used.
- Production equipment: lists are kept of the machinery and equipment present and regular testing and maintenance work is carried out on this production equipment.
- Specialist personnel for quality testing: specification of appropriately trained quality control personnel.
- Inspections: quality inspections are carried out according to the requirements specified by the customer, inspection reports are documented and archived accordingly in the agreed language for a period of 10 years and are made available to the customer on request or automatically with each delivery. The client is allowed to carry out both inspections of control activities and records and quality management audits at the supplier’s premises. The following checks are carried out and logged:
1. input check and output check,
2. inspection of the first sample and inspection of the first piece, interim inspection,
3. destructive and non-destructive testing of weld joints (by agreement),
4. inspection of production equipment and jigs before and after production, including their maintenance. - Labelling and traceability: appropriate marking on each individual part or on the accompanying cards ensures traceability throughout the production process.
- Calibration: measuring instruments and devices intended for quality control are calibrated at appropriate intervals.
- Quality non-conformity and quality improvement activities: when an error is identified, the reasons for the source of the error are determined and appropriate actions are immediately identified to prevent recurrence.
- Procedure for making a claim against defects, packaging and transport security.
Do you want to
use our services?
Send us your requirements via the contact form
or write to us directly via business@ismm.cz


